macOS Status Bar apps: Status Bar Item and Menu
April 1, 2023 | Next part |
About this tutorial
In this tutorial, we’ll be developing a status bar application for macOS Catalina and later. Because it makes use of @State variables, which were introduced with SwiftUI in Catalina, this code won’t work for versions of macOS less than 10.15. However, I will be developing tutorials for earlier OS X versions using Swift and Objective-C. Check the Objectively-Cruel posts for more information.
I should include Apple’s warnings about status bar apps upfront:
Use status items sparingly and only if the alternatives (such as a Dock menu, preference pane, or status window) are not suitable. Because there is limited space in the menu bar in which to display status items, status items are not guaranteed to be available at all times.
Basically, between the application menu bar and other status bar apps that someone might be using, this app icon could not display, rendering the app invisible to the user (especially if you hide the Dock icon). But I’ve always felt that status bar apps are cool enough to warrant developing! Also, this tutorial is just for fun. In newer versions of macOS, if you try to distribute any app without having the code pre-approved by Apple, the app will be marked as malware by Apple.
This tutorial can be done using only the AppDelegate.swift file itself because you don’t need to show a ContentView– unless you want to.
AppDelegate.swift
To get started, create a new SwiftUI project and open AppDelegate.swift.
In the applicationDidFinishLaunching function, delete all the window stuff and the ContentView line. In the @main class, use an NSMenu, NSStatusBar, and NSStatusItems to put the menu bar app in place.
import Cocoa
import SwiftUI

@main
class AppDelegate: NSObject, NSApplicationDelegate {

    @State var statusBarMenu = NSMenu(title: "Status Bar Menu")
    var statusBarItem: NSStatusItem!

    func applicationDidFinishLaunching(_ aNotification: Notification) {
        let statusBar = NSStatusBar.system
        statusBarItem = statusBar.statusItem(
          withLength: NSStatusItem.variableLength
        )
        statusBarItem.button?.title = "Hi"
        statusBarItem.menu = statusBarMenu
    }
}
-
NSMenuis a menu object. It only requires a title:NSMenu(title: "My Menu"). This object refers to the generic “Menu” object in Cocoa, so it could refer to the app’s menu bar, a pop-up menu, the status bar (in our case), contextual menus, or the Dock menu (source: How Menus Work).In this case, the NSMenu represents the pull-down menu displayed when the user clicks the
NSStatusItem, as theNSStatusItemis the object that holds the app icon in the menu bar.We will be adding the options to this menu using the
.addItemmethod later. Use a@Statevariable on theNSMenusince this will be changing (for example, say the status bar app monitors something. If the thing is off, display a red circle using theNSStatusNoneimage. If it’s running fine, display green, or else yellow).@State var statusBarMenu = NSMenu(title: "Status Bar Menu") -
NSStatusBaris an object that refers to right side of the top bar of the screen in macOS. The terminology is kind of confusing. The top bar in macOS contains the (app or system) menu bar on the left, as well as the system status bar area on the right. When you create a status bar app, the icon (or title) displays in the status bar area to the left of the system clock and Menu Extras.
With this object, we create a reference to
NSStatusBar.system, the system-wide status bar area that starts to the left of the system clock.let statusBar = NSStatusBar.system -
With the system-level
NSStatusBarobject, you create astatusItem, which is the icon and/or title of the status bar app.With the statusItem (
statusBarItem), you can set the app icon and/or title:statusBarItem = NSStatusBar.system.statusItem( withLength: NSStatusItem.variableLength ) statusBarItem.button?.image = NSImage(named: NSImage.Name("NXdefaulticon")) statusBarItem.button?.title = "W" -
Associate the status bar item with the NSStatusMenu.
statusBarItem.menu = statusBarMenu -
Finally, add menu items to the menu bar that appears when you click the status item using the
.addItemmethod:statusBarMenu.addItem( withTitle: "hi man", action: #selector(AppDelegate.hello), keyEquivalent: "h" ) statusBarMenu.addItem( withTitle: "Quit", action: #selector(AppDelegate.quit), keyEquivalent: "q" )
#selector refers to an Objective-C function and requires further explanation (below).
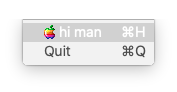
You can also add images directly to the menu items by specifying the item index:
statusBarMenu.item(at: 0)?.image = NSImage(named: "NSAppleMenuImage")
In my case, I went a little nutty with the icons. Because I’m using Catalina, I don’t have access to many newer icons and graphics in the SF Icons pack. The process for developing those assets is not so smooth as well, but I will work on that.
However, Apple has a built-in library of icons called NSImage. There is a fantastic website dedicated to documenting these images and their references called Fucking NSImage Syntax.
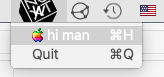
In the above screenshot, the image for the status bar item (top-level icon) comes from the NSImage library: NSImage(named: NSImage.Name("NXdefaulticon")). Eagle-eyed readers may also notice a W in the center of the image. This was done because I specified the title attribute for the status bar item. The icon can be an image, text, or both.
You also see the classic rainbow Apple logo, also from the NSImage Library: NSImage(named: "NSAppleMenuImage")
Come my #selector
statusBarMenu.addItem(
  withTitle: "hi man",
  action: #selector(AppDelegate.hello),
  keyEquivalent: "h"
)
The addItem method for the NSMenuBar requires three parameters; two of which are straightforward. withTitle specifies the text that appears on the menu item and keyEquivalent specifies the keyboard shortcut for the menu item. The action parameter would be straightforward, were it not for this unfamiliar #selector business. #selector requires that a function that conforms to Objective-C.
Note: The NSMenu can use
insertItemrather thanaddItemto specify the item’s position using the fourth parameter,at. This might be helpful for when you must know the item’s index in order to alter it. I have included one example ofinsertIteminto the full code example below.
In a pure SwiftUI contentView, for example, a button can take an action that is basically any Swift command:
Button("Click here", action: {
    print("You've been hacked")
})
The menu item action requires that the provided method must be exposed to the Objective-C runtime. We should expect this type of fun when dealing with these more legacy Apple systems. After all, we are writing an app for the menu bar, which uses APIs that have been around since macOS 10.0 or earlier.
To expose a function to obj-c, simply annotate it with @objc:
@objc func hello() {
  print("Hi world")
}

@objc func quit() {
  print("Shutting down")
  NSApplication.shared.terminate(self)
}
These functions are added below the applicationDidFinishLaunching function in your AppDelegate.swift file.
Full Code example
To wrap up, the code should look like this:
import Cocoa
import SwiftUI

@main
class AppDelegate: NSObject, NSApplicationDelegate {

    @State var statusBarMenu = NSMenu(title: "Status Bar Menu")
    var statusBarItem: NSStatusItem!

    func applicationDidFinishLaunching(_ aNotification: Notification) {
        let statusBar = NSStatusBar.system

        statusBarItem = statusBar.statusItem(
            withLength: NSStatusItem.variableLength
        )

        statusBarItem.button?.image = NSImage(named: NSImage.Name("NXdefaulticon"))
        //statusBarItem.button?.title = "W"

        statusBarItem.menu = statusBarMenu

        statusBarMenu.addItem(
            withTitle: "hi man",
            action: #selector(hello),
            keyEquivalent: "h"
        )

        statusBarMenu.insertItem(
            withTitle: "Quit",
            action: #selector(quit),
            keyEquivalent: "q",
            at: 1
        )

        statusBarMenu.item(at: 0)?.image = NSImage(named: "NSAppleMenuImage")
    }

    @objc func hello() {
        print("Hi world")
    }

    @objc func quit() {
        print("Shutting down")
        NSApplication.shared.terminate(self)
    }
}

func applicationWillTerminate(_ aNotification: Notification) {}
func applicationShouldTerminateAfterLastWindowClosed(_ sender: NSApplication) -> Bool { true }
Info.plist
The final thing to note is you must add a property to the Info.plist
Application is agent (UIElement) = YES
This ensures that a menu item doesn’t pop up in the dock, and that the application will only run as an menu bar app.
Head over to part 2.