Objective-C: Developing new macOS apps the classic way
October 30, 2023 |
About this tutorial
In this tutorial, we’ll start building apps in Objective-C, the bedrock language of iOS and macOS apps. Building in Objective-C gets us closer to the underlying libraries and frameworks that Apple provides with their Cocoa API.
What’s also fun is that if you account for deprecated methods and libraries, it’s very possible to build an app written for Mac OS X 10.6 Snow Leopard on the latest macOS release. Try that the other way around!
Since this is an incredibly large topic, please try to bear with me, or write to me on
Twitter
![]() if you want me to hurry up and keep going!
if you want me to hurry up and keep going!
Building Objective-C Projects in Xcode 14 (or later)
Being able to build an Objective-C project in newer versions of Xcode is a pre-requisite to learning the language that you must configure yourself. In earlier versions of Xcode, you could specify that you wanted an Objective-C-based Application target, but this option has been removed since the arrival of SwiftUI. Objective-C, of course, is still supported in Xcode. It still offers code completion for the language, method suggestions, and language warnings.
Essentially, to write an Objective-C App in Xcode 13, 14, 15, etc., you must remove parts of the app that aren’t needed, primarily the Swift UI elements, and alter some build settings. Of course, you could alternatively create the Objective-C project on the older hardware itself, and then deploy it to the newer system with ease. Here is a
link to a GitHub repository
![]() that is a skeleton project that will run on nearly any version of macOS since the time that Automatic Referencing Counting (ARC) was implemented in Objective-C, so about OS X Snow Leopard (10.6)
that is a skeleton project that will run on nearly any version of macOS since the time that Automatic Referencing Counting (ARC) was implemented in Objective-C, so about OS X Snow Leopard (10.6)
The following steps show you how to create a project in a modern version of Xcode so that you can write programs in Objective-C:
-
Open Xcode and create a new Project using the Other > Empty template.
-
In the new Xcode project, select File > New > Target.
-
Under macOS, select App. Name the target the same as the Project.
-
Because the target is in Swift and SwiftUI, it comes with an App file and a ContentView file.
Notice that the App file contains a
@mainproperty annontation. In Objective-C apps, the entry-point is the Main method. The@mainproperty directive tells the compiler the same thing.Delete the App and ContentFile files, otherwise the compiler will be confused.
-
Create a new file in the Project called
main.mand ensure its target is set to the target you created. -
Add the following content to the file:
#import <Foundation/Foundation.h> int main(int argc, const char * argv[]) { NSLog(@"Welcome to Objective-C"); return 0; } -
Build and run the app to print the message to the console.
Introducing the ApplicationDelegate
To make this program an app, you should implement an AppDelegate. This is a class that responds to application lifecycle events, such as when the app finishes loading or is about to close.
To do so, let’s continue in the same project:
-
Create a new Header file called
AppDelegate.h.In Mac OS X Snow Leopard and later, the AppDelegate Header is defined as an
NSOObjectthat can implement the<NSApplicationDelegate>methods.#import <Cocoa/Cocoa.h> @interface AppDelegate : NSObject<NSApplicationDelegate> { NSWindow *window; NSTextView *textView; NSTextField *textField; NSButton *button; } - (void) makeWindow; - (void) printHello: (id) sender; @endIn versions prior to 10.6, the interface declaration should just be an
NSObject.I hope to write a tutorial about the difference between
<NSApplicationDelegate>andNSObjectAppDelegate systems soon! But basically, if you are running 10.4 or 10.4, replaceNSObject<NSApplicationDelegate>with justNSObjectin the above interface declaration. -
Create an implementation class file,
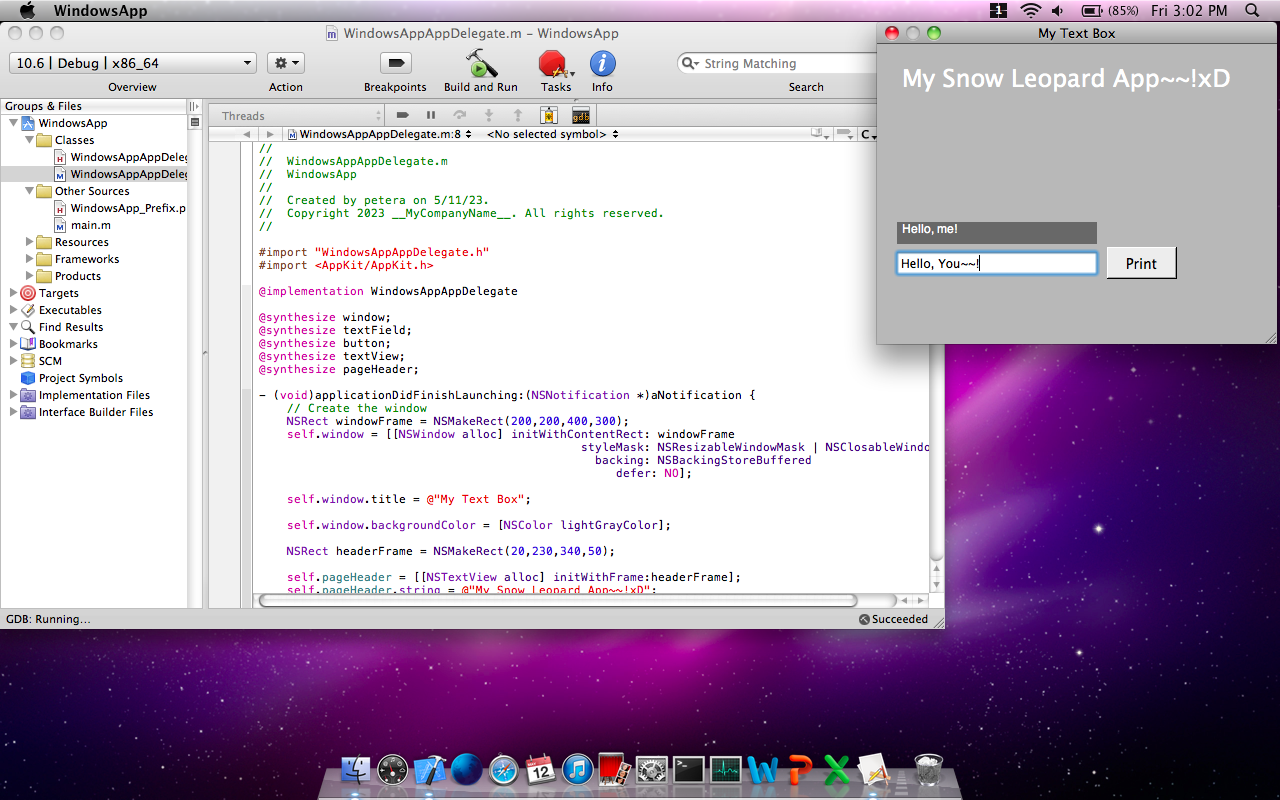
AppDelegate.m.#import "AppDelegate.h" @implementation AppDelegate - (void) applicationDidFinishLaunching: (NSNotification *)not{ [self makeWindow]; } - (void) makeWindow { window = [[NSWindow alloc] initWithContentRect: NSMakeRect(400,400,400,200) styleMask: NSWindowStyleMaskTitled | NSResizableWindowMask | NSClosableWindowMask | NSMiniaturizableWindowMask backing: NSBackingStoreBuffered defer: NO]; [window setTitle:@"My Window Title"]; textField = [[NSTextField alloc]initWithFrame:NSMakeRect(20, 70, 200, 22)]; [[window contentView] addSubview:textField]; button = [[NSButton alloc] initWithFrame:NSMakeRect(230, 65, 70, 32)]; [button setTitle:@"print"]; [button setTarget:self]; [button setAction:@selector(printHello:)]; [[window contentView] addSubview:button]; textView = [[NSTextView alloc] initWithFrame:NSMakeRect(20, 100, 200, 22)]; [textView setString:@"Hello, me!"]; [textView setEditable: NO]; [textView setSelectable: NO]; [[window contentView] addSubview:textView]; [window makeKeyAndOrderFront:NSApp]; } - (void) printHello: (id) sender { if([[textView string] isEqual: @"Hello, me!"]){ [textView setString:@"Heh, what's up?"]; } else { [textView setString: @"Hello, me!"]; } }Unfortunately for the sake of backward-compatibility, this application uses an NSWindow as its basis. It makes sense to use an NSWindow because we want to easily see and interact with this app, but the trouble comes with the initialization of the window.
The NSWindow init method, specifically initWithContentRect:styleMask:backing:defer: contains many deprecated methods around the
styleMask. This parameter determines if your window can close, minimize, maximize, or be resized.In order to create a window in version of OS X prior to 10.10 (Yosemite), use a window constructor like this:
window = [[NSWindow alloc]
    initWithContentRect: NSMakeRect(200,200,400,150)
              styleMask: NSTexturedBackgroundWindowMask |
                         NSResizableWindowMask |
                         NSClosableWindowMask |
                         NSMiniaturizableWindowMask
                backing: NSBackingStoreBuffered
                  defer:NO];
One benefit of this older window constructor is that you can have a cool textured background (brushed chrome?) that is unavailable in later macOS versions.
The other method
printHellois called when the Print button is clicked. It alternates the text within the TextView. -
IMPORTANT: Set the target member of AppDelegate.m to the target created earlier for this project.
-
Return to the
main.mfile. This part is simple to implement but complex to understand.Edit the file to add the following lines releated to NSApp and AppDelegate:
#import <Foundation/Foundation.h> #import "AppDelegate.h" int main(int argc, const char * argv[]) { NSLog(@"Let's get it started"); [NSApplication sharedApplication]; AppDelegate *appDelegate = [AppDelegate new]; [NSApp setDelegate:appDelegate]; [NSApp run]; return 0; }-
The first change is the importing of the AppDelegate interface.
-
Next, initialize the application, set the app delegate, and run the app.
The NSApplication Overview doc explains this well. The App Life Cycle document is another good explainer.
One thing that is a bit confusing is the
NSAppvariable. We didn’t initialize anything calledNSApp. So what is it? It is a global variable that is initialized after you call the[NSApplication sharedApplication]method. It allows you to set the application delegate, which is the class that responds to messages such asApplicationDidFinishLaunchingorapplicationShouldTerminate. You have full control over the app delegate class: You can choose which system events your class should respond to, and how to display your app, etc.The
NSApplicationitself keeps track of the app’s windows and menus, sends and receives app-level notifications (for example, macOS sends Apple events to your app at various times, such as when the app is launched or reopened), and allows you to set delegates for the app, the menu bar, the status icon, the dock icon, and even the Touch Bar.Similar to a status Bar, which is also a shared resource, the
NSApplicationinteracts with the system services, while the delegate (your app) interacts with theNSApplicationobject. In a status bar app instance, there is a shared status bar, and your app is one status bar item, which must interact with underlying system services.
-
At this point, running the app will launch the app window. Other aspects to implement are the menu bar options, a possible status bar icon, a dock icon, and more. But this should be fine for part 1.