Programming HTML video captions with WebVTT
November 10, 2023 |
WebVTT Captions Programming
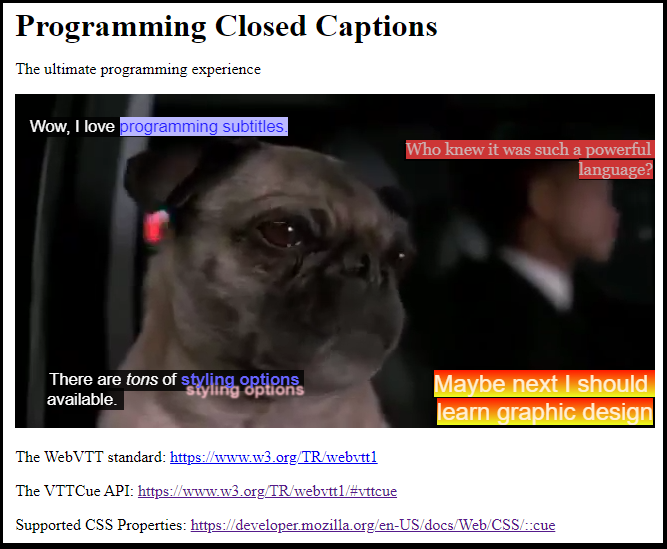
Did you know that HTML video closed-captions and subtitles are customizable? Watch this video (with captions on) to learn more!
This project dives into the options available for the WebVTT closed caption format.
Get Started
I’ve created a
WebVTT Captions Programming
![]() GitHub repository. You should grab that project to see all my sample code.
GitHub repository. You should grab that project to see all my sample code.
To run this project:
git clone <repo-url>
cd <repo-name>
npm install
npm start

# instead of npm start, you can run this command:
# node server.js

# When server is running, go to localhost:3000 in a browser.
WebVTT Programming
At a basic level, the WebVTT (Web Video Text Tracks) format connects the HTML5 <video> tag to a <track> element. Captions in VTT format can be generated using various
speech recognition tools.
![]() WebVTT captions are served by a web server, hence the need for a simple running server when testing any caption modifications.
WebVTT captions are served by a web server, hence the need for a simple running server when testing any caption modifications.
In HTML, VTT captions can be integrated into a video by way of the <video> tag:
<!-- Either invocation works -->
<video controls src="./MIB2.mp4">
    <track default kind="captions" srclang="en-US" src="./MIB2.vtt" />
</video>

<!-- But some browsers prefer this format -->
<video controls>
    <source type='video/mp4' src="./MIB2.mp4">
    <track default kind="captions" srclang="en-US" src="./MIB2.vtt" />
</video>
A basic .vtt file looks like this:
WEBVTT

00:00:00.000 --> 00:00:05.500
 Go on now, go! Walk out the door!

00:00:05.500 --> 00:00:08.320
 Just turn around now

00:00:08.320 --> 00:00:15.000
 'Cause you're not welcome anymore
A VTT file starts with the string WEBVTT and one or more empty lines. Then, cue blocks (delineated with an empty line) define the cue timing (00:00:00.000 --> 00:00:05.500) and a cue payload (Go on now, go! Walk out the door!) for the timing and the content of the captions over the video.
But, very relevant to our artistic ambitions, the VTT format also supports in-line cue settings, region blocks, and style blocks, which allow you to take advantage of most of the style elements available to the CSS pseudo-element
::cue.
![]() VTT also supports external style blocks and comments.
VTT also supports external style blocks and comments.
So we can take our plain captions and begin to style them.
Styling with Cue Settings
Cue Settings
![]() are limited configuration options regarding the position and alignment of the cue box and the cue text within. They include
are limited configuration options regarding the position and alignment of the cue box and the cue text within. They include line, position, size, align, and region. We will discuss region later.
Cue settings are added right after the cue timings, like so:
WEBVTT

00:00:01.400 --> 00:00:20.640 line:1 align:left position:2% size:50%
*Singing* And I learned to get along

00:00:03.000 --> 00:00:20.640 line:2 align:right position:100% size:50%
 And so you're back. From outer space

00:00:06.500 --> 00:00:20.640 line:90 align:left position:5% size:50%
 I just walked in to find you here with that sad look upon your face

00:00:10.320 --> 00:00:20.640 line:90 align:right position:100% size:40%
 I should have changed that stupid lock
When we let the video play, we see these captions display like so:
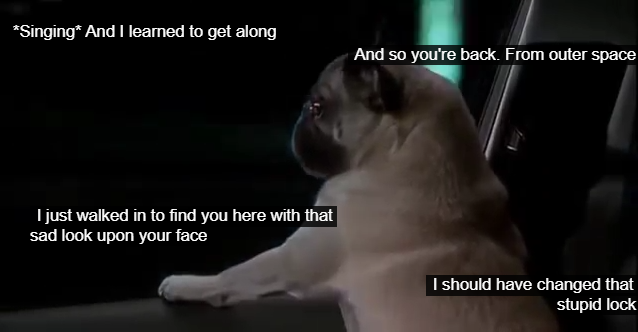
Briefly:
linedetermines the height of the caption.line:1means 1 unit below the top (it doesn’t seem like 1%, but maybe it is).line:90means 90 units (probably 90%?) below the top. In the above screen cap, I should note that the display of low captions (captions near the bottom) are affected when you hover over the video and show the controls. They raise up above the controls and stay there.
aligncontrols the text alignment, so some examples arealign:left,align:right,align:center.positiondetermines the indent of the cue box.- Notice in the top left
*singing*caption, thatposition:2%, and the bottom leftI just walked incaptionposition:5%. The latter is a bit more indented than the former for this reason. - The right side captions (
align:right) each haveposition:100%, and therefore 0 indentation from the right.
- Notice in the top left
sizeis the proportion of the video (horizontally) that the cue box can take up.- If
size:100%, it can extend the entire way across the screen. - Notice the
I just walked incaption hassize:50%and creates a line break exactly at 50% of the screen (horizontally).
- If
Styling with Style Blocks
This is where I see the power of VTT programming come to the fore. You can write CSS classes directly in the VTT instructions and reference them throughout the cue blocks. You mark a style block by writing STYLE on a line (where the line before it is empty), and then writing a CSS ::cue pseudo-class.
These classes can be added to the entire cue payload, or simply applied to particular words or phrases within the cue payload.
Take this simple example, which defines two ::cue classes:
WEBVTT

STYLE
::cue(.topleft) {
  color: #201bff;
  background-color: #bbb9ff;
}

STYLE
::cue(.topright) {
  color: #ccb1b1;
  background-color: #cc3535;
  font-family: Georgia, serif;
}

00:00:01.400 --> 00:00:20.640 line:1 align:left position:2% size:50%
<c.topleft>*Singing* And I learned to get along</c>

00:00:03.000 --> 00:00:20.640 line:2 align:right position:100% size:50%
And so you're back. <c.topright>From outer space</c>
Which gives us the following captions:
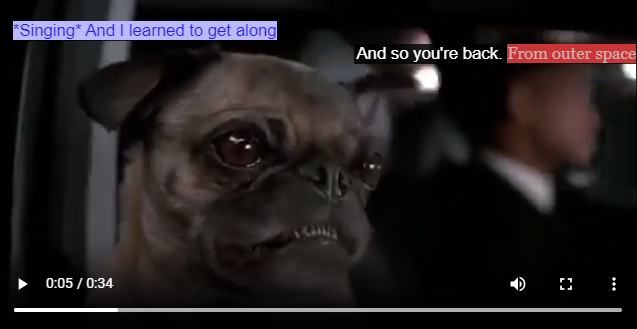
As you can see in the above example, classes can be applied to all or some of the payload.
The style classes are applied to the cue payloads by specifying:
<c.classname> classy text </c>
You can also subclass the payloads, for example:
<c.classname> This is classy text, this is <c.secondclass> second class text </c>, but it still suites me. </c>
In VTT, the supported CSS properties conform mostly to the ::cue psudo-class supported properties. Although I’m not sure that the background-image property is supported. This
W3 standard document
![]() offers more information.
offers more information.
Style Block specials: lang and voice and embedded classes
There are two special classes (as far as I can tell) that also support styling: the lang tag and the voice, or v, tag.
- I suppose the purpose behind the
langtag is to allow captions to support different languages within a video with one primary language. It’s up to you, the caption artist, to decide how to represent a different language. - The
v(orvoice) tag is a cool feature but seems difficult to implement, even with machines producing the captions. It allows you to specify a caption style each timeBobspeaks, for example, that could look completely different from wheneverAlicespeaks.
These classes are called in a slightly different way than normal cue classes. Here’s an example:
WEBVTT

STYLE
::cue(lang[lang="en-GB"]) {
  color: cyan;
}
::cue([lang="en-US"]) { color: yellow; }
::cue(v[voice="Fred"]) { color: #e7b8c1; }
::cue(v[voice="Bill"]) { color: #b4a9e3; }
::cue(v[voice="Voicedude"]) {
	color: #e7b8c1;
	font-weight: bold;
	text-decoration: underline dotted white;
}
::cue(.graphicDesignIsMyPassion) {
	font-size: 1.5rem;
	color: #ffe687;
	background-color: #702963;
	opacity: 0.99;
	outline: thick double #32a1ce;
}

00:00:01.400 --> 00:00:20.640 line:1 align:left position:2% size:50%
*Singing* And I <lang en-GB>learned <lang en-US>to get</lang> along and so</lang> you

00:00:02.000 --> 00:00:20.640 line:75 align:left position:15% size:50%
<v Fred>Hi, my name is Fred

00:00:03.500 --> 00:00:20.640 line:85 align:right position:85% size:50%
<v Bill>Hi, I’m Bill

00:00:05.800 --> 00:00:10.110 align:center size:60%
<c.graphicDesignIsMyPassion>THIS IS MY <v Voicedude>FAVORITE</v> ARTISTIC MEDIUM.</c>
As an aside: Remember how the first style block example said
STYLEabove each class (i.e., it said STYLE two times)? That is only required when separating classes with an empty line. If multiple classes are defined in series (with no empty lines), you don’t have to declareSTYLEmultiple times. But Lord help you if you add in an extra empty line and don’t redeclareSTYLE!
The above code produces the following:
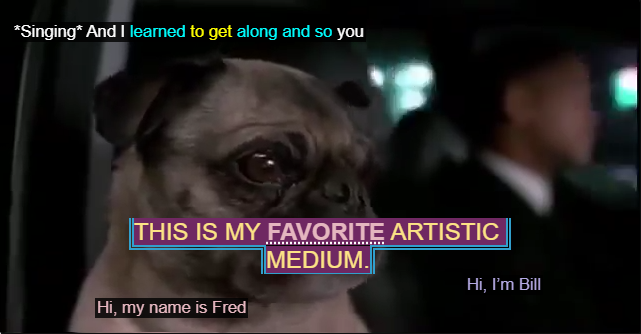
Notice how these special classes are called differently from custom classes: You essentially get a special <v> and <lang> element, and the ability to call the named attribute straight-away (e.g, <v Voicedude> rather than <c.classname>). It’s just an interesting design choice, and gives you an additional way to subclass content, or group types of content.
There is one thing I’m not quite understanding yet (okay, there are many things). But, recall that when we called the <track> element in the HTML, we provided a srclang attribute equal to "en-US":
<video controls src="./MIB2.mp4">
    <track default kind="captions" srclang="en-US" src="./MIB2.vtt" />
</video>
However, if we define the ::cue([lang="en-US"]) { color: yellow; } class, the text does not automatically follow that definition (i.e., all text is not by default yellow).
This may make us wonder about the interplay between the HTML and the VTT file. But the good news is that VTT style class definitions can be called from the HTML.
External Style Blocks
You can embed your style blocks in external style sheets. Since I am far from a pro web designer, I prefer to just define them in my HTML under the <style> tag.
If you are defining the style within the VTT file, you merely need to reference the ::cue psuedo-class. But from an external style sheet, you must specify that the style applies to the video element, for example:
<html>
  <head>
    <style>
    video::cue(.graphicDesignIsMyPassion) {
      font-size: 1.5rem;
      color: #ffe687;
      background-color: #702963;
      opacity: 0.99;
      outline: thick double #32a1ce;
    }
    </style>
  </head>
This is how you achieve interplay between HTML and VTT. You can further the abstraction, of course, to CSS files. Since the <track> element is only served by a web server, I assume you could get much fancier and incorporate SCSS or SASS into your caption designs.
I know little about this subject, but, as I understand it, SCSS and SASS involve computing and compiling styles based on input from the server. This allows you to program variables and states into your stylesheets.
💡 On the CSS side, you could use a counter to program numerous classes (for example,class1,class2, etc.), setting their attributes to one value from an array of hex color values, and set other attributes programmatically. Then on the VTT side, you could use a scripting language like bash, sed, or Python to loop through each line in the file and prepend the class definition (<c.class1>), which is not required to be closed at the end of the line.
Cue Regions
The final thing I want to mention about styling your captions is how to define a Cue Region. A cue region is the last type of Cue Setting (I told you I’d get to it!). Remember, Cue Settings are defined in-line next to a Cue Timing. Here’s a refresher example:
00:00:14.070 --> 00:00:20.640 region:fred align:left
What’s a Cue Region?
- A WebVTT region represents a subpart of the video viewport and provides a limited rendering area for WebVTT caption or subtitle cues.
- Regions provide a means to group caption or subtitle cues so the cues can be rendered together, which is particularly important when scrolling up.
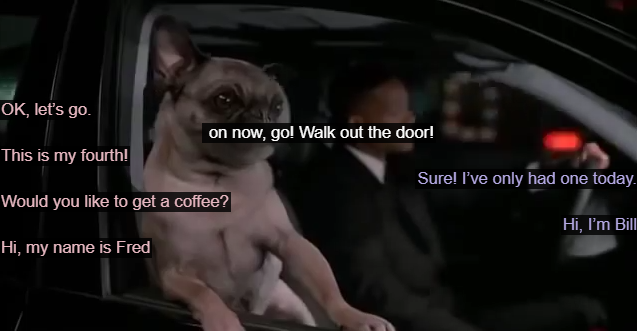
So not only do regions define the boundaries for a group of captions, but they also allow content to layer on top of itself (“scroll up”). A great example is in a dialogue between two people. There aren’t two people talking in the following image, but you could imagine if there were because they render in separate areas in the viewport, and they are added one-on-top-of-the-other for each speaker:
Here’s the sample code:
WEBVTT

STYLE
::cue(v[voice="Fred"]) { color: #e7b8c1; }
::cue(v[voice="Bill"]) { color: #b4a9e3; }

REGION
id:fred
width:40%
lines:3
regionanchor:0%,100%
viewportanchor:10%,90%
scroll:up

REGION
id:bill
width:40%
lines:3
regionanchor:100%,100%
viewportanchor:90%,90%
scroll:up

00:00:14.070 --> 00:00:20.640 region:fred align:left
<v Fred>Hi, my name is Fred

00:00:15.070 --> 00:00:20.640 region:bill align:right
<v Bill>Hi, I’m Bill

00:00:16.070 --> 00:00:20.640 region:fred align:left
<v Fred>Would you like to get a coffee?

00:00:17.070 --> 00:00:20.640 region:bill align:right
<v Bill>Sure! I’ve only had one today.

00:00:18.000 --> 00:00:20.640 region:fred align:left
<v Fred>This is my fourth!

00:00:18.500 --> 00:00:20.640 region:fred align:left
<v Fred>OK, let’s go.

00:00:18.130 --> 00:00:20.640
 on now, go! Walk out the door!
Although the final line (on now, go! Walk out the door!) has nothing to do with the conversation between Bill and Fred, I’ve left it in to show that it renders normally, unaffected by regional divisions.
A Cue Region consists of the following components in any order, all of which are optional:
-
idis used to reference the region in the cue setting. -
widthis the horizontal percentage of the region. -
linesreflects the number of lines that will print in the region. I believe you are responsible for actually managing this, however. -
scrollcan benoneorup. If set toup, new cues are added to the bottom and push text up until it reaches the max number oflines, and is supposed to disappear. -
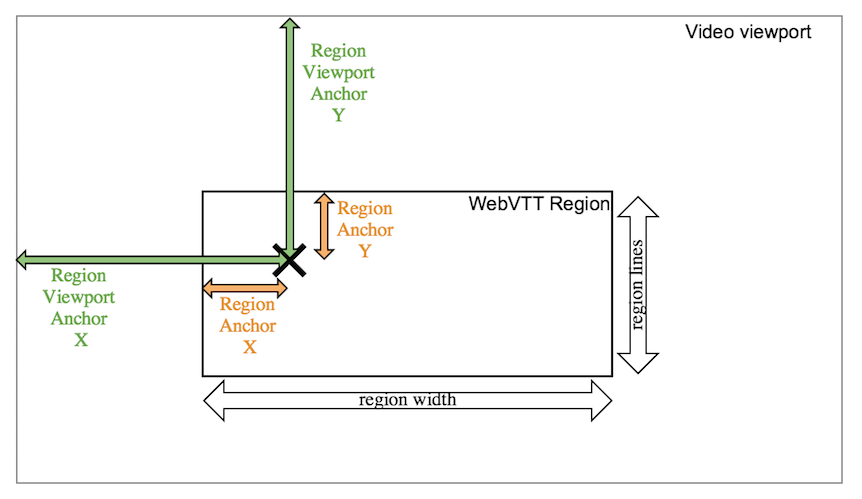
regionanchorandviewportanchorspecify where the region is anchored. Still trying to understand this.W3 provided a rare diagram to explain the region and viewport anchors (this is the only diagram in the 30,000 word specification!), so I might as well reproduce it here:
Go forth and craft some beautiful art in this wide-open medium! Tag me on
Twitter
![]() if you produce some cool stuff that moves the medium forward! I want to see.
if you produce some cool stuff that moves the medium forward! I want to see.