Let's Build Photo Booth for Touch Bar: Part 1
December 3, 2023 | Previous part | Next part |
We left the macOS Touch Bar introduction post discussing how some app workflows have been enhanced with Touch Bar functionality. Shockingly, however, I found that Photo Booth had not been updated to support the Touch Bar!
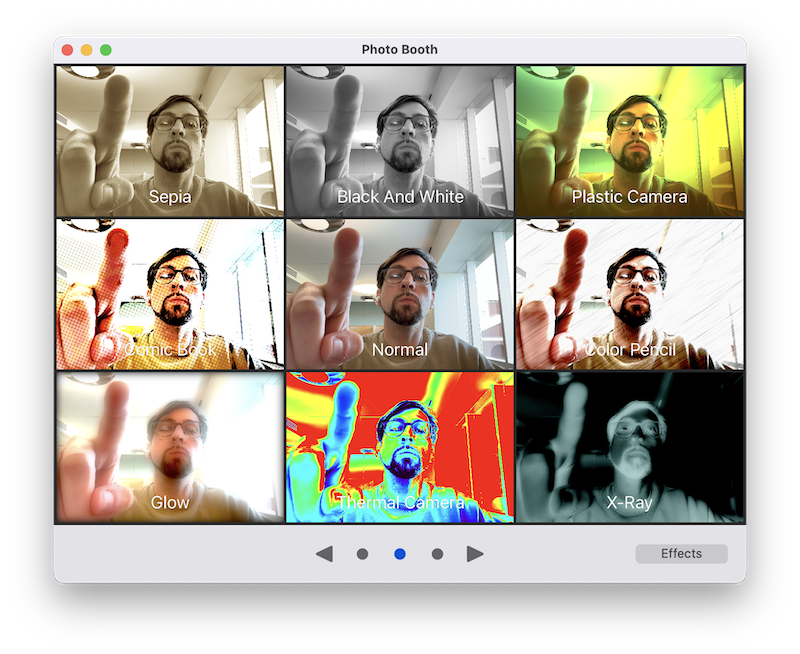 Photo Booth is a default macOS application with its origins in the MacBook, which was the first Apple laptop with a built-in iSight camera. In 2008, your facebook wall was littered with the iconic filter effects of your friends with their new friends from college. But, like most of those friendships from college, the app withered from neglect. Or, maybe it was perfect for its time, but other things started to take priority.
So in 2016, Apple didn’t dedicate any resources toward updating Photo Booth to make use of the Touch Bar, and they elected not to do so for 7 years. And now the Touch Bar is dead. But maybe you have a Touch Bar MacBook Pro. If you don’t, you can still get the Touch Bar experience by launching Xcode and pressing SHIFT + CMD + 8 to view a Touch Bar simulator on-screen.
About this tutorial
Note: This tutorial assumes you have some familiarity with Xcode and programming for macOS or iOS. For more information, see the Exploring the structure of a SwiftUI app
tutorial from Apple.
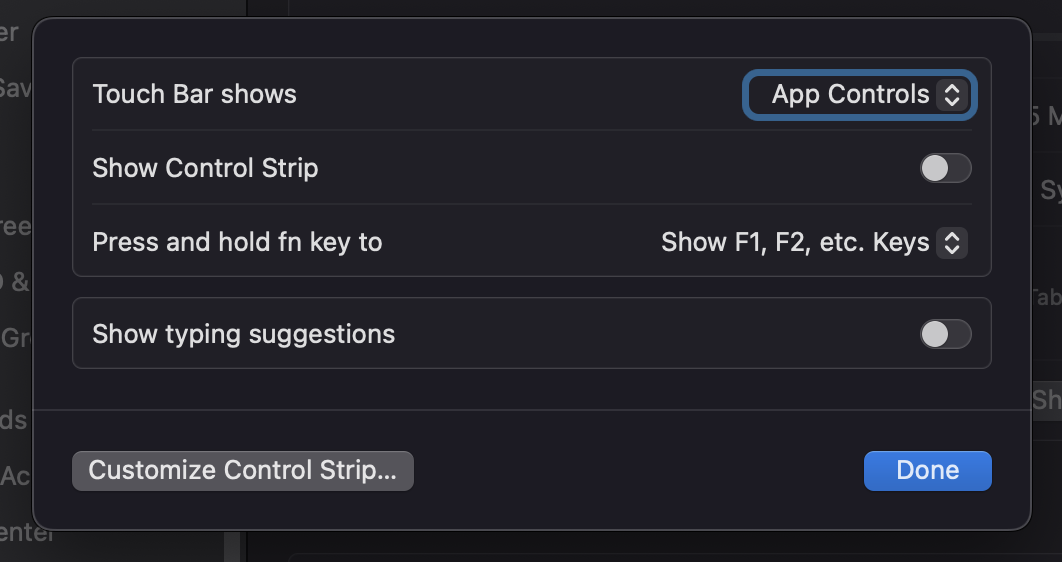
Another Note: Before running this tutorial, I recommend you customize your Touch Bar (whether virtual or real). With the Touch Bar enabled, go to Settings > Keyboard > Touch Bar Settings…, and match with these values:
This project introduces how to develop applications for the macOS Touch Bar and control the built-in MacBook camera in Swift. It’s straightforward to add elements to the Touch Bar. The interesting work comes from the AVFoundation framework to use the macOS camera.
-
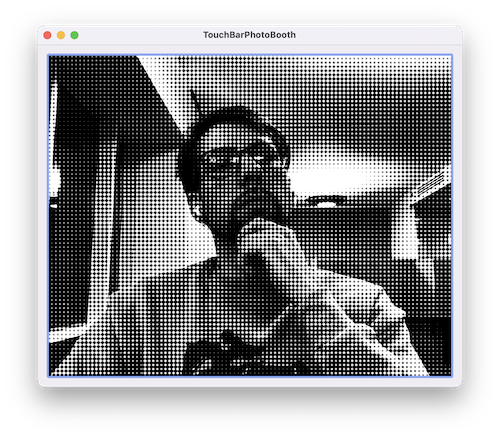
In Part 1 (this part), we set up an Xcode project with Camera permissions, display a video Preview area on the screen, and smaller preview thumbnails on the Touch Bar that each contain a filter effect. When you touch a thumbnail on the Touch Bar, the effect is shown on screen.
-
In Part 2, we add a Camera capture button which saves the photo with the effect to a directory within Pictures. This part requires additional user permissions and a complicated conversion between internal macOS image types, which we thankfully abstract away in a method. But it’s worth separating these two parts because they offer different lessons.
-
In a hypothetical Part 3, we could make this into an iOS app, or a continuity app (an app that can seamlessly switch between macOS and iOS cameras).
I set up a
GitHub repository
![]() if you prefer to work by cloning the project and following along. The branch name corresponds with the part of the implementation (e.g.,
if you prefer to work by cloning the project and following along. The branch name corresponds with the part of the implementation (e.g., part1, part2).
Set up the project
Let’s fire up Xcode and start putting the project together.
- Create a new project in Xcode called TouchBarPhotoBooth with a macOS App target.
- Open the project target, go to Signing & Capabilities > App Sandbox > Hardware and select the Camera check-box.
- Click Info. Right-click inside the Custom properties table and click Add Row. From the Key drop-down, select Privacy - Camera Usage Description. For the Value, write something about why you need the camera such as, Cause you’re so beautiful!
- In the project, we will be editing the
ContentViewfile. Create the following Swift files in the same directory:Camera,CameraPreview, andTouchBarView.
TouchBarPhotoBoothApp.swift
The entry-point of the application is TouchBarPhotoBoothApp.swift. Here’s how it should look:
TouchBarPhotoBoothApp.swift
// visit peterarsenault.industries
import SwiftUI

@main
struct TouchBarPhotoBoothApp: App {
    var body: some Scene {
        WindowGroup {
            ContentView()
        }
    }
}
If you’re newer to SwiftUI, this constructor replaces AppDelegate as the entry point into the app. This is indicated by the @main annotation. Its role is to point to the ContentView. If we wanted to show a different view, we would specify that in place of ContentView(), but since we aren’t, we won’t be touching this file.
Fun fact!: With Objective-C apps, the app entry-point had to be called
main.m. It was from thismainmethod that you called your Application Delegate and told it torun. This is why even today the entry-point has a@mainannotation.
ContentView.swift
ContentView will be the main view of our app. You don’t need to change anything in this file yet.
ContentView.swift
// visit peterarsenault.industries
import SwiftUI

struct ContentView: View {
    var body: some View {
        VStack {
            Image(systemName: "globe")
                .imageScale(.large)
                .foregroundStyle(.tint)
            Text("Hello, world!")
        }
        .padding()
    }
}

#Preview {
    ContentView()
}
This file is also the only other Swift boilerplate code that Xcode gives us, so the rest of our app is up to us.
The good news is that Camera and CameraPreview will be simplified classes based on sample code that Apple published in a project called
Supporting Continuity Camera in your macOS app.
![]() Let’s start there.
Let’s start there.
Camera.swift
This class is adapted from code that Apple provides in their Continuity Camera tutorial, so it retains the reference to Apple’s licensing information (see the project GitHub to view that).
Camera.swift
/*
See LICENSE folder for this sample’s licensing information.

Abstract:
A view that provides a preview of the content the camera captures.
*/
import AVFoundation

@MainActor
class Camera: ObservableObject {
    internal let output = AVCapturePhotoOutput()
    internal let session = AVCaptureSession()

    private(set) var alert = false
    private(set) var states = States.unknown
    private(set) var isSetup = false
    private(set) var isAuthorized = false
    private(set) var isRunning = false

    enum States: @unchecked Sendable {
        case unknown
        case unauthorized
        case failed
        case running
        case stopped
    }

    lazy var preview: (String) -> CameraPreview = { incomingFilter in
        CameraPreview(session: self.session, filter: incomingFilter)
    }

    func start() async {
        guard await authorize() else {
            self.states = .unauthorized
            return
        }
        do {
            try setup()
            startSession()
        } catch {
            states = .failed
        }
    }

    internal func authorize() async -> Bool {
        let status = AVCaptureDevice.authorizationStatus(for: .video)
        isAuthorized = status == .authorized
        if status == .notDetermined {
            isAuthorized = await AVCaptureDevice.requestAccess(for: .video)
        }
        return isAuthorized
    }

    internal func setup() throws {
        guard !isSetup else { return }

        session.beginConfiguration()
        session.sessionPreset = .high
        guard let captureDevice = AVCaptureDevice.default(for: .video) else { return }
        guard let input = try? AVCaptureDeviceInput(device: captureDevice) else { return }
        session.addInput(input)
        session.addOutput(output)
        session.commitConfiguration()
        isSetup = true
    }

    internal func startSession() {
        Task.detached(priority: .userInitiated) {
            guard await !self.isRunning else { return }
            self.session.startRunning()
            await MainActor.run {
                self.isRunning = self.session.isRunning
                self.states = .running
            }
        }
    }
}
The entry-point into this class is the start() method, which will be called when ContentView loads. Here’s what start() does:
- It first calls the
authorize()function, which checks whether the user has authorized the use of the camera. The first time the app is run, the user sees a popup window that asks permission to use the camera and prints your Camera Usage Description. If the camera permission is not granted, the video preview won’t display. - After confirming authorization, the
setup()function is called. This is where the video configuration is determined. Specifically, it sets the input device as the system default (in macOS, the built-in camera) and the output as anAVCapturePhotoOutput()object. If we were targeting iOS (as we may in the future), there could be many more types of input devices (i.e., iPhone cameras) to choose from.AVCapturePhotoOutput()requires some explanation but stay tuned for Part 2 as it is more relevant for saving photos.
- After the camera setup is confirmed for this session (
AVCaptureSession()), the session gets the signal to begin throughstartSession(). Your camera indicator flashes green and begins recording.
The variables in this class straightforwardly relate to the state or authorization of the session, but there is one outlier: preview.
lazy var preview: (String) -> CameraPreview = { incomingFilter in
	CameraPreview(session: self.session, filter: incomingFilter)
}
preview is a lazy variable, which means it is only evaluated when it is accessed (in this case, after all the phases of start have completed). It must be lazy because the session is not available immediately.
preview’s type is a closure that takes a String (identified as incomingFilter) and returns a CameraPreview object, which requires a session and a filter parameter. We explore the CameraPreview object next.
CameraPreview.swift
The CameraPreview object defines the area that displays the video output from the camera, provided by the AVCaptureVideoPreviewLayer object.
CameraPreview.swift
/*
See LICENSE folder for this sample’s licensing information.

Abstract:
A view that provides a preview of the content the camera captures.
*/
import SwiftUI
import AVFoundation

struct CameraPreview: NSViewRepresentable {
    private var session: AVCaptureSession
    private var filter: String

    init(session: AVCaptureSession, filter: String) {
        self.session = session
        self.filter = filter
    }

    func makeNSView(context: Context) -> CaptureVideoPreview {
        CaptureVideoPreview(session: session, filter: filter)
    }

    func updateNSView(_ nsView: CaptureVideoPreview, context: Context) {
        nsView.updateFilter(session: session, filter: filter)
    }

    class CaptureVideoPreview: NSView {
        var previewLayer = AVCaptureVideoPreviewLayer()
        init(session: AVCaptureSession, filter: String) {
            super.init(frame: .zero)

            previewLayer = AVCaptureVideoPreviewLayer(session: session)
            previewLayer.videoGravity = .resizeAspectFill
            previewLayer.connection?.automaticallyAdjustsVideoMirroring = false
            previewLayer.backgroundColor = .black
            previewLayer.compositingFilter = CIFilter(name:filter)
            layer = previewLayer
            wantsLayer = true
        }

        func updateFilter(session: AVCaptureSession,filter: String){
            print("Filter name: \(filter)")
            previewLayer.videoGravity = .resizeAspectFill
            previewLayer.connection?.automaticallyAdjustsVideoMirroring = false
            previewLayer.backgroundColor = .black
            previewLayer.compositingFilter = CIFilter(name:filter)
            layer = previewLayer
            wantsLayer = true
        }

        required init?(coder: NSCoder) {
            fatalError("init(coder:) has not been implemented")
        }
    }
}
This object is adapted from Apple’s Continuity Camera tutorial, but differs in several important ways.
-
Our version includes a
filterparameter in theCameraPreviewobject initialization. This allows us to show any number of video previews with a dynamic filter applied. Also, filters are not included in ContinuityCam, so there is nocompositingFilterattribute for the previewLayer in that project. -
This class implements the
updateNSViewfunction, which is invoked any time thefilterstate variable changes. It’s nice that this function exists as part of theNSViewRepresentableprotocol because it allows us to reuse the sameCaptureViewPreviewobject.
When a CameraPreview is initialized (recall that the lazy preview variable in Camera does this), the CaptureVideoPreview view initializes a preview layer associated with the session and adds a filter on top.
Note the following line:
previewLayer.compositingFilter = CIFilter(name:filter)
A CIFilter is an image processor from the Core Image framework that allows you to overlay a named effect on an image. For more information, see
CIFilter.
![]()
When the filter changes through the user pushing a Touch Bar button, this message is sent to the CameraPreview through a @State variable on the UI, the updateNSView function is invoked, and the filter is changed on the preview layer.
Return to ContentView.swift
So now that we have our controllers set up, let’s return to the main view and change it to start the camera and show the camera display preview.
And while we’re here, let’s abstract away the Touch Bar view using the .touchBar()
auxiliary view modifier
![]() and include the
and include the .onAppear() and .onDisappear()
input and event modifiers.
![]()
ContentView.swift
// visit peterarsenault.industries
import SwiftUI

struct ContentView: View {
    @StateObject var camera = Camera()
    @State private var previewPhotoEffect = ""

    var body: some View {
        ZStack(){
            camera.preview(previewPhotoEffect)
                .padding()
                .frame(maxWidth: .infinity)
            TextField("", text: $previewPhotoEffect)
                .frame(width:0, height:0)
                .focusable()
                .touchBar(){
                    TouchBarView(camera: camera, previewPhotoEffect: $previewPhotoEffect, w:70)
                }
        }
        .frame(maxWidth: .infinity)
        .onAppear {
            Task {
                await camera.start()
            }
        }
        .onDisappear(
            perform: {
                NSApp.terminate(self)
            }
        )
    }
}

#Preview {
    ContentView()
}
For the UI, I used a ZStack() that shows the camera preview screen with a TextField hidden under it that manages the TouchBarView. I think this is a SwiftUI bug. When testing with the Virtual Touch Bar, there were no problems. But on a real machine, the Touch Bar didn’t show the app content until I set .touchBar as a modifier of a TextField (rather than as a modifier to a VStack, HStack, ZStack, or even Text element). I believe this is because a TextField takes a binding variable, which usually demands a more responsive UI.
We use two enforcer variables (annotated with @State and @StateObject) to keep track of the Camera object and preview filter values globally.
One weird trick… If you can’t keep your annotations straight, remember that the State (as in like, the government) and Objects of the State (as in like, the police) are the enforcers of proper behavior. You are bound to follow their laws under penalty, so your behavior is Binding to the State.
When ContentView opens, the .onAppear() event calls on the Camera’s start() method, which performs the checks described earlier and starts the camera session. Meanwhile, the Camera preview area is defined as a black screen until the session is confirmed. When video starts being captured, it is displayed over that area.
The .touchBar() view modifier defines the content for the Touch Bar. In this case, we separate the content into a sub-view called TouchBarView. This view will use the global camera object and send a binding preview filter effect back to ContentView:
.touchBar() {
    TouchBarView(camera: camera,
        previewPhotoEffect: $previewPhotoEffect)
}
TouchBarView.swift
The final step is to write the Touch Bar view.
TouchBarView.swift
// visit peterarsenault.industries
import SwiftUI

struct TouchBarView: View {
    var camera: Camera
    @Binding var previewPhotoEffect: String
    @State var w: CGFloat?
    @State var h: CGFloat?

    var body: some View {
        ScrollView(.horizontal){
            HStack(){
                Button(action: {
                    previewPhotoEffect = "CISepiaTone"
                }, label: {
                    camera.preview("CISepiaTone")
                }).frame(width:w, height:h)
                    .controlSize(.large)

                Button(action: {
                    previewPhotoEffect = "CIColorInvert"
                }, label: {
                    camera.preview("CIColorInvert")
                }).frame(width:w, height:h)
                    .controlSize(.large)

                Button(action: {
                    previewPhotoEffect = "CIThermal"
                }, label: {
                    camera.preview("CIThermal")
                }).frame(width:w, height:h)
                    .controlSize(.large)

                Button(action: {
                    previewPhotoEffect = "CIDotScreen"
                }, label: {
                    camera.preview("CIDotScreen")
                }).frame(width:w, height:h)
                    .controlSize(.large)

                Button(action: {
                    previewPhotoEffect = "CIPixellate"
                }, label: {
                    camera.preview("CIPixellate")
                }).frame(width:w, height:h)
                    .controlSize(.large)

                Button(action: {
                    previewPhotoEffect = "CIPointillize"
                }, label: {
                    camera.preview("CIPointillize")
                }).frame(width:w, height:h)
                    .controlSize(.large)

                Button(action: {
                    previewPhotoEffect = "CIGaborGradients"
                }, label: {
                    camera.preview("CIGaborGradients")
                }).frame(width:w, height:h)
                    .controlSize(.large)

                Button(action: {
                    previewPhotoEffect = "CIComicEffect"
                }, label: {
                    camera.preview("CIComicEffect")
                }).frame(width:w, height:h)
                    .controlSize(.large)

                Button(action: {
                    previewPhotoEffect = "CIColorMonochrome"
                }, label: {
                    camera.preview("CIColorMonochrome")
                }).frame(width:w, height:h)
                    .controlSize(.large)

                Button(action: {
                    previewPhotoEffect = "CIMorphologyGradient"
                }, label: {
                    camera.preview("CIMorphologyGradient")
                }).frame(width:w, height:h)
                    .controlSize(.large)
            }.frame(minHeight: 0, maxHeight: .greatestFiniteMagnitude)

        }
    }
}
This view defines a number of buttons, which use the camera.preview output as their labels with a specified filter. For example:
Button(action: {
    previewPhotoEffect = "CIThermal"
}, label: {
    camera.preview("CIThermal")
}).frame(width:w, height:h)
    .controlSize(.large)
You can play around with the filter effects by looking up the CIFilter effects in the documentation. Our sample code defines about 10 buttons, which look like this on the Touch Bar:

When you touch a button, the value of previewPhotoEffect is updated globally. The message is reported to the controller (@State) variable on the parent view (ContentView). This causes the UI to refresh with an updated filter.
Next steps
With all that code in place, you’re ready to run the project and play around with different filters, inclduing the image distortion effects like CICircleSplashDistortion.
Let’s move on to saving the images locally in Part 2 ➡️➡️➡️